Running Cozystack on Three 8 GB Raspberry Pi 5 Boards
Three Raspberry Pi 5 boards on a desk, and on them a cluster that runs containers and virtual machines, with multi-tenancy, managed databases and everything else Cozystack provides.
Why bother? Cozystack is usually installed on a rack of servers in a data center, so just trying the platform out means renting hardware or spinning up VMs in a cloud. Three Raspberry Pis cost about as much as a dinner out, fit in a backpack and run from a wall socket. You can learn on them, demo Cozystack at a conference, debug your own automation or keep a small cloud at home. And I was curious how far the platform can be squeezed and what breaks first.
The article has two parts: first I explain how to put this Cozy-Frankenstein on Raspberry Pis, and then I complain about how I got there.
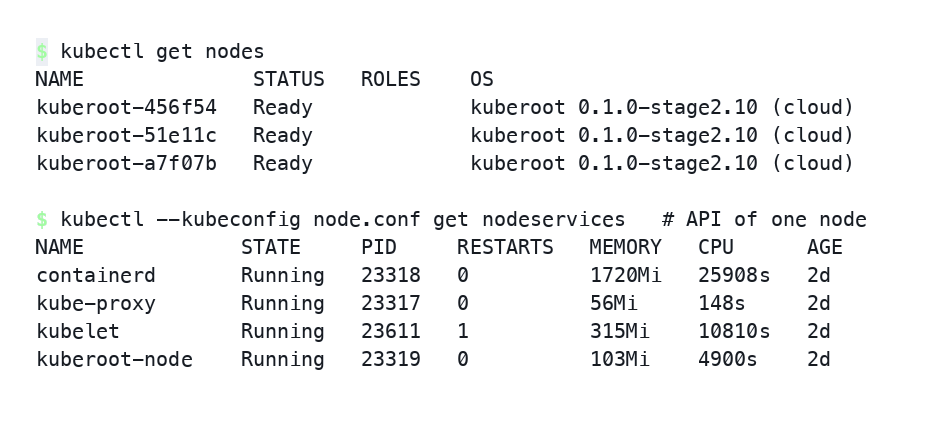
Unfortunately, I had no actual Raspberry Pis, so for now I made do with virtual machines. It would be great if you install all of this on real hardware and tell me what went wrong.
At a glance
- What: Cozystack running on three Raspberry Pi 5 boards, each with 8 GB of RAM and an NVMe drive.
- Underneath: the
clouddistribution of kuberoot, a Kubernetes distribution that is its own operating system. Virtual machines run directly on KVM through Cloud Hypervisor, without KubeVirt. - Raspberry Pi specifics: a Cloud Hypervisor patch of about 5,000 lines that adds GICv2 support for the BCM2712, and memory reservations sized for 8 GB boards.
- Cozystack: the cozyroot fork, release v1.7.0-alpha.13, with blockstor storage, cozyplane networking and components sized for small hardware.
- Fault tolerance: three equal control-plane nodes with etcd; volumes replicated across two boards.
- Status: tested in emulation and on an amd64 bench with 8 GB nodes; not yet on physical boards.
Part one: how to install Cozystack on Raspberry Pi
What you need
I set a hard constraint from the start: Raspberry Pi 5 boards with 8 GB of RAM. The 4 GB boards obviously cannot carry the platform, and using 16 GB boards would be cheating.
Each board gets an NVMe drive on a PCIe HAT and a microSD card for the boot image. The system is installed on the NVMe drive, and the replicated storage lives there too; the card is only needed to boot the installer and can be removed afterwards. A Pi 4 will also do, but the memory calculations in this article are for the four Cortex-A76 cores of the Pi 5.
Building the image
There is no ready-made Cozystack image for Raspberry Pi, so you will have to build one yourself. And on the boards we will install Cozystack not on Talos, but on top of kuberoot.
kuberoot is my experimental project: a toolkit for building Kubernetes distributions that are their own operating system. The Linux kernel, init, kubelet and the control plane are packed into a single image, and a node is managed through kubectl like any other cluster object. It grew out of my earlier article “ The inevitable future of Kubernetes”, which argued that the orchestrator should follow the path of the Linux kernel and grow distributions. I described how kuberoot works in a separate article.
I chose kuberoot because otherwise I would have had to bring along KubeVirt, which Cozystack uses by default, and on Raspberry Pi it runs into the hardware: the Pi has no hugepages, and nobody has tested disk import in CDI on arm64 yet. On top of that, KubeVirt itself looks like overhead for such modest resources. kuberoot has a cloud bundle that runs both containers and virtual machines on one node, and the machines run directly on KVM as Cloud Hypervisor processes, without KubeVirt or libvirt. kuberoot itself, with the control plane and etcd, takes about a gigabyte per node; the rest is left to the platform.
Raspberry Pi support in kuberoot currently lives in the integration/pi-cloud branch:
git clone -b integration/pi-cloud https://github.com/kuberoot-dev/kuberoot.git
cd kuberoot
All the files mentioned below — build scripts, the builder manifest, the hypervisor patch — are in this branch, and you can also browse them on GitHub.
These sources produce a kernel with DRBD modules for replicated storage, Go programs, a root file system, an initramfs and the Cloud Hypervisor hypervisor, which for arm64 is compiled from Rust. The build is heavy: it needs about 60 GiB for sources, compiler caches and results, up to 16 GiB of memory and several hours of CPU time. So I built it in a VM in the cloud rather than on my Mac. The pod is described in
hack/hetzner/builder.yaml: a container with Go and the kernel toolchain, an Alpine container that assembles the root file system, and a small HTTP server you later download the results from. The builder is written for Cozystack and asks for a volume of class replicated; when building in your own cluster, change storageClassName to yours.
The builder is driven by the
hack/hetzner.sh script, which runs on your machine: it copies the sources into the pod, runs the build there and assembles the boot card image from the results. The script’s name is left over from the first test bench and means nothing. The script takes the cluster, context and namespace from environment variables:
export KUBECONFIG_WORKSHOP=~/.kube/config   # kubeconfig of the cluster for the builder
export KUBE_CONTEXT=my-cluster              # context in it
export KUBEROOT_NS=kuberoot-build           # namespace (must exist)

hack/hetzner.sh builder                     # create the builder pod and its volume
KUBEROOT_DISTRO=cloud hack/hetzner.sh build arm64
KUBEROOT_DISTRO=cloud hack/hetzner.sh media arm64
build builds everything listed above, and Cloud Hypervisor from pinned sources with the patch without which virtual machines will not start on real boards. media assembles the boot card image media.img from these; further on I call it the boot medium. The arm64 medium also gets the Raspberry Pi firmware blobs: nobody builds them, they are downloaded, nailed to a specific release, and media does that itself.
For the hypervisor, the builder needs the GCC 12 cross-compiler for aarch64-linux-gnu and Rust 1.93.0 with the aarch64-unknown-linux-gnu target. The Rust version comes from the pin in
build/cloud-hypervisor/pin.env, not whatever is considered stable today. You do not need to install them by hand: the script brings them into the pod itself, and if it cannot, it tells you exactly which tool is missing.
In the version this article is about, the cloud build produces these files:
| File | Size |
|---|---|
media.img | 473 MiB |
rootfs.squashfs | 281 MiB |
initrd.cpio | 22.5 MiB |
vmm/cloud-hypervisor | 5.9 MiB |
vmm/ch-remote | 1.9 MiB |
The hypervisor is built statically and already sits in the image’s root file system at /usr/bin/cloud-hypervisor, so nothing has to be delivered to the board. Next to it, /usr/share/kuberoot/cloud-hypervisor-build.json records which sources and which compiler it was built from.
Before writing the image to a card, it is worth checking that you built exactly what you need. Next to the hypervisor binaries there is a vmm/build-contract file in which the build itself states the architecture, the Rust version and the capability the patch added:
architecture=arm64
target=aarch64-unknown-linux-gnu
rust_version=1.93.0
features=kvm
capability=arm-gicv2-acpi-cpu-hotadd-v1
Writing the boot medium
Download the finished media.img from the builder (it serves results over HTTP) and verify the checksum:
kubectl --context "$KUBE_CONTEXT" -n "$KUBEROOT_NS" port-forward svc/builder 8080:8080
curl -O http://127.0.0.1:8080/arm64/media.img
shasum -a 256 media.img
Now write the image to the card. First find it in the list of disks and check carefully that it really is the card: dd will wipe everything on the selected disk.
diskutil list external physical          # macOS; on Linux, lsblk
diskutil unmountDisk /dev/diskN
sudo dd if=media.img of=/dev/rdiskN bs=4m status=progress
sync && diskutil eject /dev/diskN
On macOS write to rdiskN, not diskN: it is the unbuffered device, and writing is roughly an order of magnitude faster. On Linux the same is done to /dev/sdX with bs=4M oflag=direct.
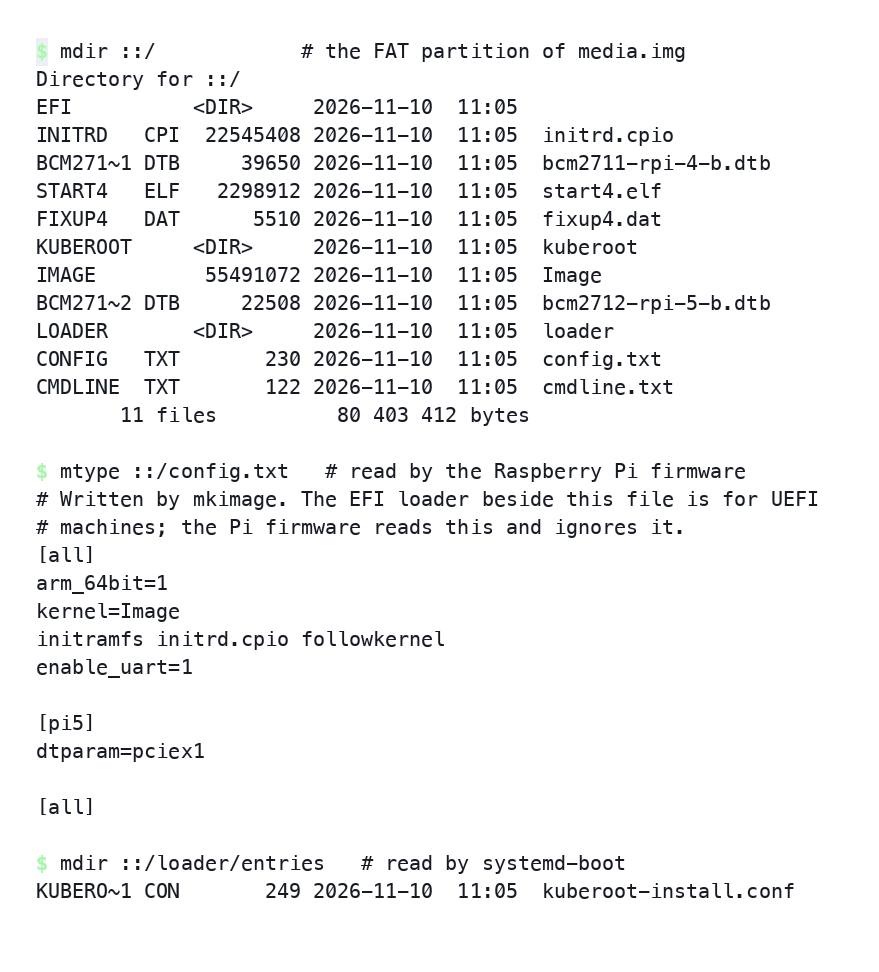
The same card works for all three boards: nothing on it is set up for a particular board, so there is no need to label the cards.
The first board and choosing the cluster database
Insert the card into the first board and power it on. The Raspberry Pi firmware reads config.txt from the card’s FAT partition, and systemd-boot reads the /loader directory from the same partition. They do not get in each other’s way, so the same image boots both a board and a virtual machine.
The Pi 5 needs nothing else: all its firmware is stored in EEPROM. The Pi 4 also needs firmware files, because its EEPROM holds only the first stage of the bootloader — but they are already on the card.
The board boots into the installer, which brings up the node API and tells you how to connect to it:
kuberoot 0.1.0-pi-cloud.1 installer

  This machine is running kuberoot from the boot media.
    node       kuberoot-123456
    address    10.0.2.15
    kernel     6.18.55-kuberoot

  The same installation can be done remotely with kubectl:
    node API   https://10.0.2.15:50000
    kubectl get disks
    kubectl create -f installation.yaml
These nodes have neither SSH nor a shell. A node is managed through the Kubernetes API, including before there is a cluster: that is exactly how it gets installed. You can continue from the board’s console, but it is more convenient to work through kubectl from your own computer right away — you will have to do it that way with the other two boards anyway.
The cluster database is chosen on the first board, and it cannot be changed later. Three control-plane nodes need etcd, so the first board must boot with the kernel parameter kuberoot.datastore=etcd. It is set when building the card image:
hack/hetzner.sh media arm64 kuberoot.datastore=etcd
A cluster created on kine (a single-node store on top of SQLite) stays on kine. There is no automatic migration to etcd: you would have to bring up a new cluster and move workloads by hand.
Now install to NVMe:
apiVersion: node.kuberoot.dev/v1alpha1
kind: Installation
metadata:
  name: install
spec:
  disk: nvme0n1
  reboot: true
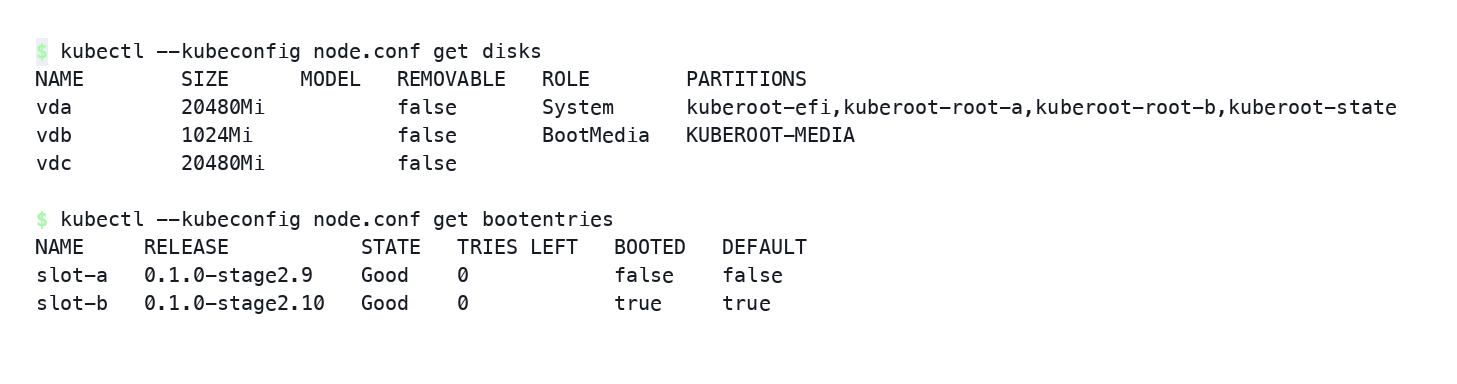
The disk name is shown by kubectl get disks when kubectl is pointed at the node API — the installer prints the address on its console. The installer partitions the drive into an EFI partition with systemd-boot, two root partitions and a data partition, and then moves the node’s keys, the cluster details and, for a control-plane node, a snapshot of the cluster database there. There are two root partitions so that updates are done properly: a new version is written to the inactive partition and booted in trial mode, and if the node does not become Ready within five minutes, it goes back to the previous version.
The remaining boards
The other two boards are installed from the same card in exactly the same way (you can write three cards at once). Then they have to be joined to the cluster as control-plane nodes, and this is done in the cluster, not on the nodes:
apiVersion: node.kuberoot.dev/v1alpha1
kind: JoinTicket
metadata: {name: cp-2}
spec:
  nodeName: kuberoot-dcaf7a
  role: ControlPlane
  address: 10.0.0.12
With such a JoinTicket the node is first added to etcd as a learner: it copies the cluster data but does not take part in the quorum yet. It becomes a full etcd member once it has all the data and has caught up with the other nodes.
The order matters: install first, then join. If you do it the other way round, the installer writes a single-member etcd to the disk, and the database on the node diverges from the cluster’s.
Worker nodes, if you add them later, reach the API server through a local load balancer built into the node API. It watches the kubernetes service and learns by itself which control-plane nodes have appeared and which are gone. So neither a virtual IP nor an external load balancer is needed, and everything works on an ordinary home network.
Storage
Replicated disks come from
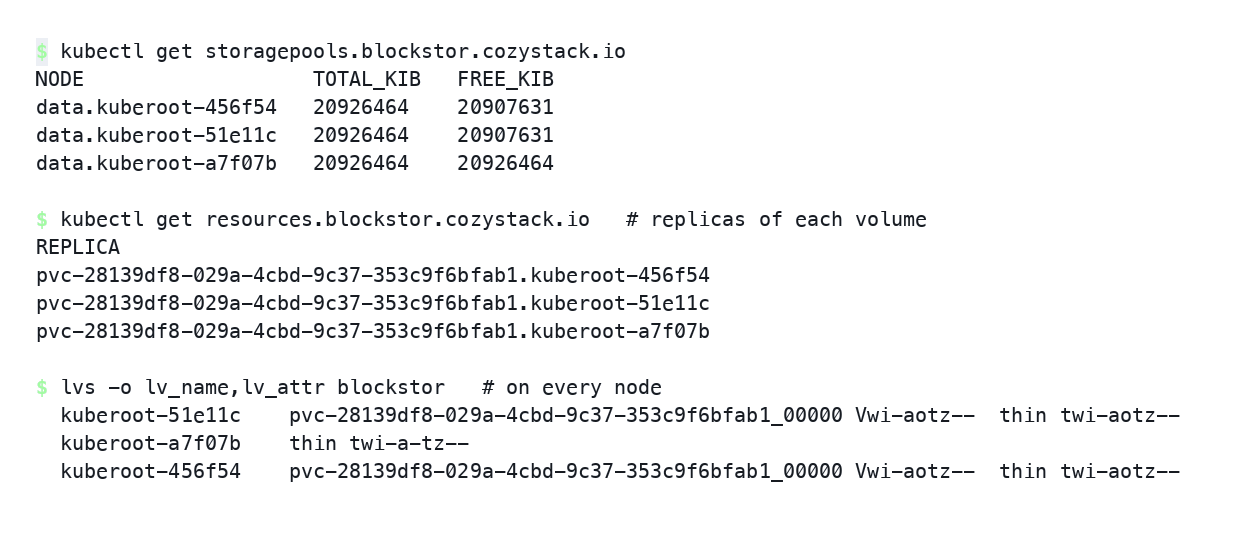
blockstor. It replicates volumes with DRBD on top of an LVM thin pool on each board’s NVMe drive and exposes a LINSTOR-compatible API, so the regular LINSTOR CSI driver works on top. On three nodes with placementCount: 2 a volume has two copies with data, and the third board gets a diskless replica: through it, a pod on that board works with the volume over the network.
There is one quirk worth knowing before the first reboot of a board. After a reboot the thin pool stays on disk but is not activated, and until it is activated, LVM does not report how full it is. blockstor sees no free space in the pool, skips that board, and volumes stop being created across the whole cluster with a message that there are not enough nodes or pools — even though all nodes are online and the pools are in place. So after every node update, check the pool in the blockstor-satellite pod on every board:
lvs -o lv_name,lv_attr blockstor
An active pool’s attributes start with twi-a, an inactive one shows twi---tz--, and it has to be brought up with lvchange -ay blockstor/thin. In the build from this article this is already fixed: blockstor activates an inactive pool itself and rereads its capacity, and the fix has been sent upstream (
cozystack/blockstor#229). If you install blockstor without it, check by hand.
Installing Cozystack
The cluster is up and the storage works — time to install Cozystack, which brings tenants, managed databases, virtual machines and tenant Kubernetes clusters.
You need to install not the regular Cozystack but my fork, cozyroot, release v1.7.0-alpha.13. Regular Cozystack is designed for servers, and without changes it neither fits on three 8 GB boards nor survives the loss of a node. Here is what I changed in the fork:
- Storage without Java. Instead of LINSTOR, which needs a JVM, storage is managed by blockstor with the same API — on an 8 GB board that saves a noticeable share of memory.
- cozyplane networking. Pod and tenant networking on eBPF instead of Kube-OVN, which needs Open vSwitch in the kernel.
- Component sizes for the hardware. Memory and CPU requests of the platform’s components are now set for the specific hardware rather than one size for all. Without this, the platform asked for more memory than the board has.
- Surviving the loss of a node. Flux, the Cozystack operator, its controller, the dashboard and the object storage controller now run in two copies on different nodes or come back by themselves when their node disappears. A monitoring alert was added for when the cluster can no longer lose a single node.
- Small fixes, such as the correct cluster domain instead of a hardcoded
cozy.local, and a stopped virtual machine that is no longer reported as broken.
Each change is a separate PR in the fork’s repository; I have not sent them upstream to Cozystack yet.
Two more things have to be configured correctly on this hardware the first time.
The first is the API server address. In generic mode the Cozystack operator takes it from the settings and writes it into its own Deployment. If you give it the address of a particular board, then after that board is replaced the operator will keep connecting to an address where nobody is, and recreating the pod will not help, because the address is baked into the Deployment. Point it at the local load balancer that exists on every node instead:
cozystack:
  apiServerHost: 127.0.0.1
  apiServerPort: 6444
This applies to every component that needs the API server address, including k8sServiceHost and k8sServicePort for Cilium. The address 127.0.0.1:6444 survives the loss or replacement of any board and works for components with hostNetwork: true.
The second is memory. Of the 8 GiB on a board, the distribution reserves 3.5 GiB for the system: 1 GiB goes to the memory pool for virtual machines, 2.5 GiB to the node’s own services and hypervisor processes. About four is left for pods. The pool size is set by the node API parameter --machine-memory-budget-mib=1024. If you adapt this to boards with a different amount of memory, change everything together: the machine pool, the kubelet reservation and the memory limits of the individual services.
Running a virtual machine
A virtual machine is described by an ordinary Kubernetes resource, and the hypervisor runs as a process on the node, not in a pod:
apiVersion: vm.kuberoot.dev/v1alpha2
kind: VirtualMachine
metadata:
  name: worker
  namespace: default
spec:
  cpus: 1
  maxCPUs: 4
  memory: 1Gi
  maxMemory: 1Gi
  replicas: 1
  disk:
    size: 4Gi
    image: https://example.org/debian-13-uefi.qcow2
maxCPUs and maxMemory let you resize a machine without a reboot: raise cpus or memory within these limits, and the running guest gets the resources immediately. The limits themselves are set when the machine is created and do not change afterwards — they can be neither added nor removed. A machine without limits is simpler: it restarts when resized.
On a board there are two constraints here. First, the whole maxMemory is reserved in the node’s virtual machine pool at once, even if the guest has only a small part of it so far. With the default 1 GiB pool, a machine with maxMemory: 4Gi therefore simply cannot be created — either keep the limits small or grow the pool together with the reservation. Second, when maxMemory is set, both memory values must be multiples of 128 MiB; virtio-mem requires it.
Adding CPUs on the fly on ARM is possible only if the hypervisor itself supports it. Before starting a machine, the node API asks cloud-hypervisor for its list of capabilities and looks for CPU hot-add with KVM and GICv2, up to eight virtual CPUs. If the support is not there or the hypervisor does not answer, the machine is not started, and that happens before anything already running is stopped. This is exactly what the patched build is for; it is the subject of part two.
What you end up with
In the end there are three Raspberry Pis on the desk, and together they make a full small cloud. All three boards are equal: each has its own API server and its own copy of etcd, so the cluster survives any of them being switched off, and volume data is kept in two copies on different boards. Cozystack with its dashboard and API runs on top, and you use it the same way as a regular installation in a data center.
In the dashboard you create a tenant and order what you need in it: PostgreSQL or another managed database, a virtual machine. All of this is installed from the same packages as in regular Cozystack, with no changes for Raspberry Pi. The same set is available through kubectl and the Cozystack API, so on these boards you can debug your manifests, CI and automation before taking them to real hardware.
Resources are of course limited: about 4 GiB per board is left for pods and a gigabyte for virtual machines. A couple of databases and a couple of small VMs will fit; a loaded production workload will not. But it is a real platform with tenants, storage and fault tolerance that you can carry in your pocket: for a home lab, a conference booth or teaching people to work with Cozystack.
Part two: what had to be reworked
Almost all of the changes below were made in kuberoot — in the image installed on the boards and in its build. It is my experimental project, so “made a fix” here means “fixed it at home”, not “landed it upstream in a big and important project”. None of the problems below required changes to Cozystack itself; the right settings were enough.
The interrupt controller
Cloud Hypervisor on ARM works only with the GICv3 interrupt controller, while the BCM2712 processor in the Raspberry Pi 5 has the older GICv2. Because of this, stock Cloud Hypervisor cannot start a single virtual machine on a Pi 5, and without a fix nothing I wrote above about virtual machines would work on the board.
This cannot be worked around with settings: a guest VM gets the interrupt controller the host hardware has, and the GIC-400 is GICv2. Server ARM processors have GICv3 with virtualization extensions, and some of them can also emulate GICv2. The Pi has only GICv2, so a hypervisor that knows only GICv3 will not start a guest VM on it at all.
So I wrote a patch for Cloud Hypervisor. It lives in the kuberoot repository at
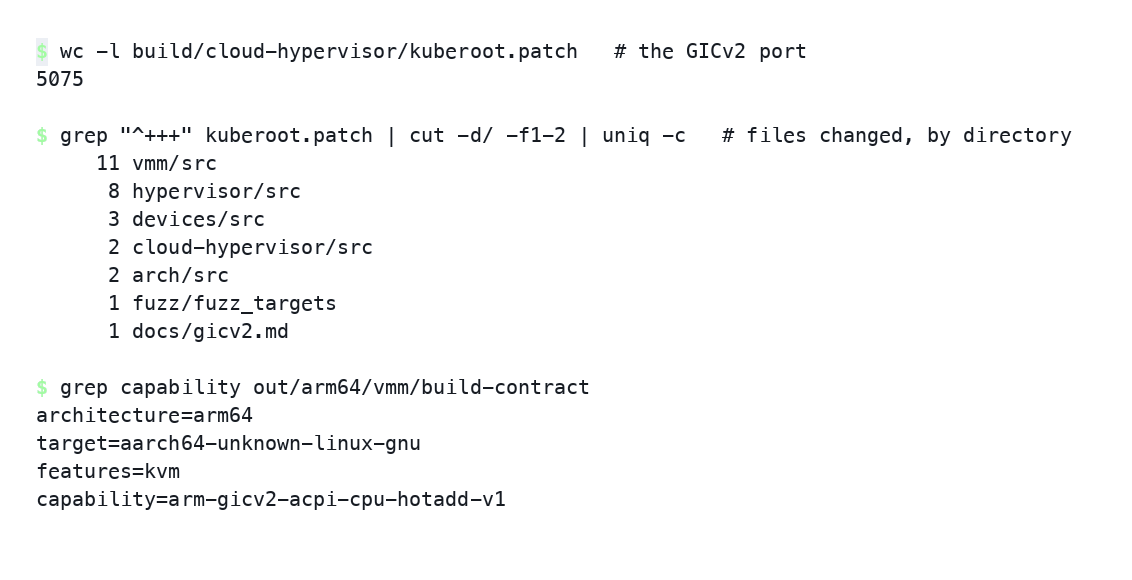
build/cloud-hypervisor/kuberoot.patch and is applied to the Cloud Hypervisor sources when the image is built; I have not sent it to Cloud Hypervisor itself. The patch adds GICv2 support, while GICv3 is still chosen where it exists: nothing changes on a server, and a different code path runs on the board. It is about five thousand lines on top of Cloud Hypervisor v53.0, and most of the work went not into the interrupt controller itself but into what depends on it: the ACPI tables that describe a GICv2 system to the guest, and CPU hot-add, which has to announce a new CPU to the guest through these tables rather than through the GICv3 mechanisms upstream uses.
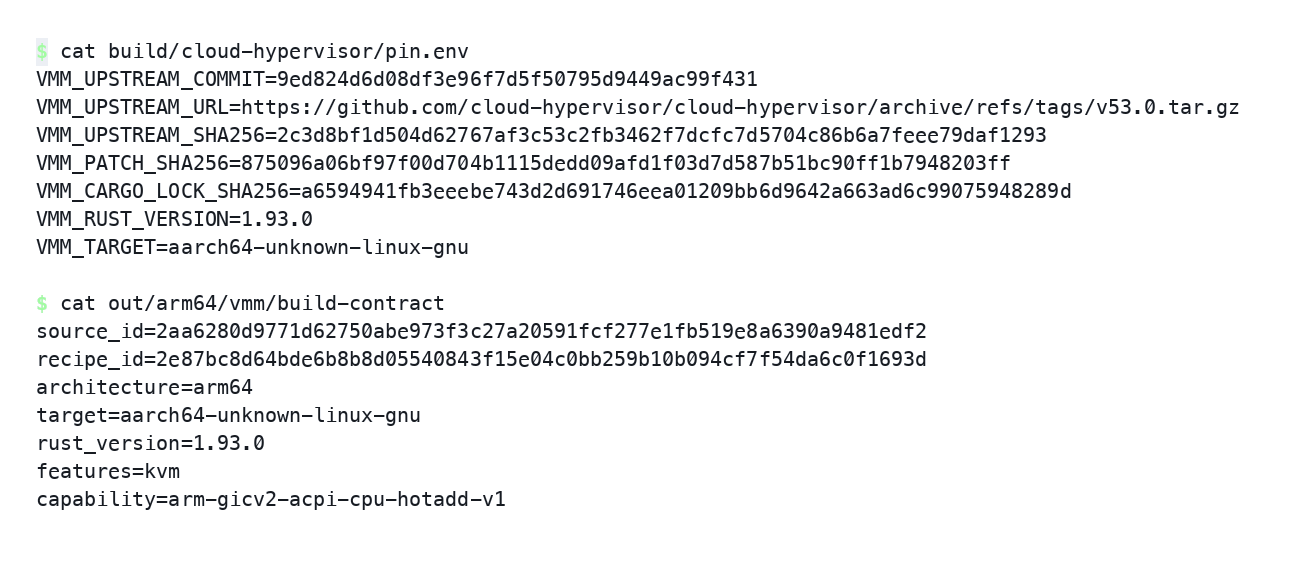
The patch is large, so the build itself confirms what it built and from what.
pin.env records the upstream commit and the checksums of the archive, the patch and Cargo.lock; if any of them does not match, the build stops. Sources are verified by checksum, not by a tag that can be moved. The resulting binary reports capability=arm-gicv2-acpi-cpu-hotadd-v1, and the node API asks the binary itself about it before starting a machine with growth limits. The same opened file is used for the check and for the launch, so it cannot be swapped in between. There is deliberately no fallback to a stock build: if the hypervisor cannot do what is needed, it must refuse explicitly rather than start guests that will then behave differently.
Memory on an 8 GB board
Memory took the most effort, and the mistakes here are useful not only to those installing Cozystack on Raspberry Pis.
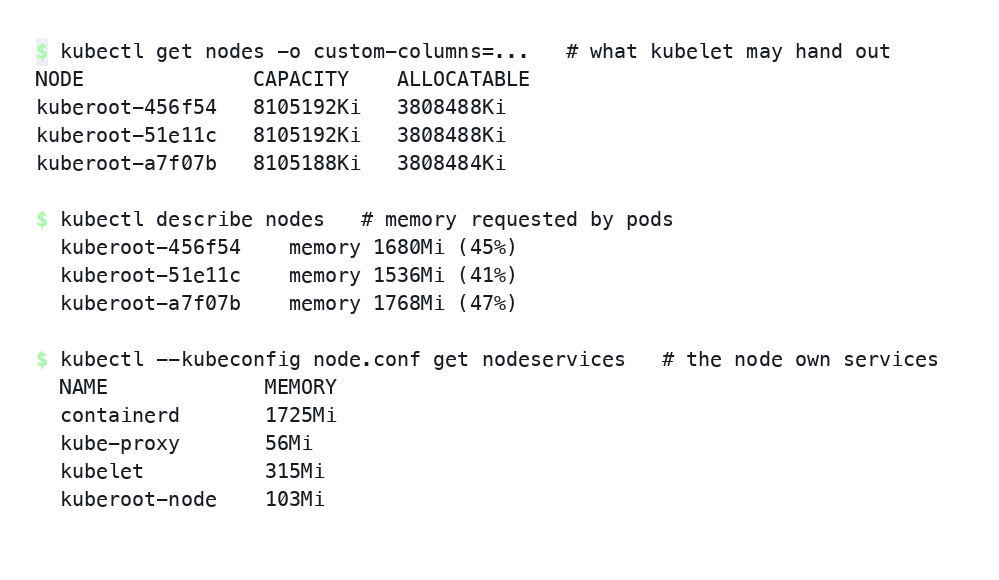
In the first attempt I sized the reservation mostly for guests: 4 GiB for the pool, 2 GiB for services. Pods were left with 1.6 GiB, and the platform simply did not install. An obvious mistake, found in minutes.
Then I raised the services reservation to 2 GiB. The installation went through, but the problem got much worse. Kubelet admitted pods, counting as free the memory already taken by the node’s services, and immediately began evicting those pods. Every eviction left a pod object behind. The API server’s cache grew on these objects, the API server ate more memory, evictions grew further — and the cluster got stuck in a state where it evicted thousands of pods an hour while looking merely busy from the outside. The lesson: first measure how much memory the services take on a running node, and only then choose the reservation. On this profile the services take about 3.3 GiB, the reservation is 3.5.
There was a second, less visible problem. Every node service now has GOMEMLIMIT set to roughly twice its measured working size. Without it, the Go garbage collector lets the heap grow to twice the live data and is reluctant to return memory to the system: a single spike — a mass deletion of objects or a cache rebuild — raises the service’s footprint for a long time. The API server reached 2.1 GiB this way and stayed there until a restart. Nobody would notice this on a server, but on an 8 GB board it decides whether the platform fits.
Both the reservation and GOMEMLIMIT are configured in kuberoot, in the cloud distribution: they are properties of the image installed on the board, not of Cozystack.
The boot medium and the installer are one thing
A test that installed the previous version and upgraded it to the current one started failing, always in the same place: the installation never finished. It looked like an upgrade bug.
It was not the upgrade. The layout of files on the boot medium belongs to the same version as the installer: mkimage lays the files out, and the installer knows where to find them. The test built both media with mkimage from the current branch, producing a mix: the new layout and the old installer. The current branch had moved the initramfs to the root of the medium and could find it in both places, while the previous version looked only where it used to be. So it wrote the bootloader and the kernel and stopped. And since the symptom was “the installation does not finish” rather than “file not found”, it did not look like a layout change at all.
I fixed this in the kuberoot test: each medium is now built from the sources of the version that boots from it, and the test fetches the previous version’s sources for that. The general lesson: if one tool reads files written by another, their versions must match, and when they do not, the error shows up far from the mismatch.
Two errors that tried to hide
The arm64 hypervisor build exited with code 1 and not a single error message. The last line in the log was a successfully completed step, so it looked as if the build had failed on work already done. The culprit was a command -v check for the cross-compiler: under set -e it exits the script without printing anything. And the builder had neither the compiler nor Rust at all. Now every tool is checked where it is first needed, and if it is missing, the script names it — instead of a mystery there is one clear line.
The next attempt was evicted by kubelet in the middle of the build. The message named one container: Rust had been installed into its home directory and filled the small local disk. But the ephemeral storage limit applies to the whole pod, so all four containers were killed along with the running build. The manifest already kept compiler temporary files, GOPATH and the Go cache on the persistent volume for the same reason. Now Rust moved there too, and RUSTUP_HOME, CARGO_HOME and the PATH to them are set in the manifest rather than by the script. Both fixes are in the kuberoot build scripts and the builder manifest.
Two failures you only see after replacing a node
Both surfaced when I removed one control-plane node from the cluster and joined a new one in its place. Until then they were invisible.
The Cozystack operator went into a crash loop, racked up 257 restarts and kept trying to connect to the removed board. The address was not stuck somewhere in the pod’s state and was not in a ConfigMap: it had been written into the Deployment when the platform was installed in generic mode. Recreating the pod would have changed nothing. No Cozystack code had to be changed here; the installation setting described in part one was enough: point the operator at the node’s local load balancer 127.0.0.1:6444. It exists on every node and therefore survives the replacement of any board. Cilium on these nodes already uses the same address.
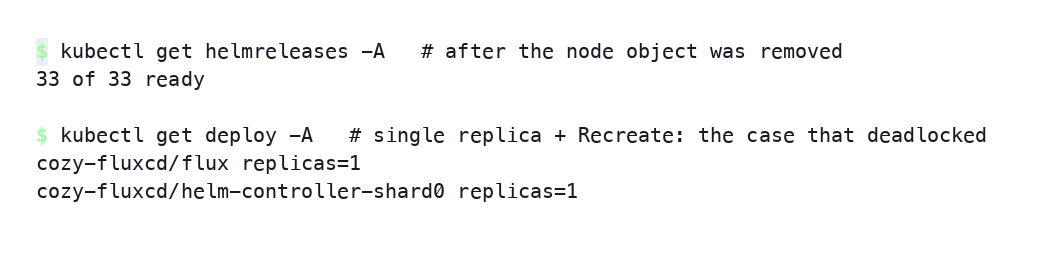
The second failure stalled the project for a day. Flux stood still for 29 hours, and from the outside it looked like this: every HelmRelease in the tree complained that a dependency was not ready, while the root one reported itself ready. The cause was a Deployment with one replica and the Recreate strategy, under which a new pod is created only after the old one has fully disappeared. The old pod hung in Terminating on the removed board — that is, forever — and the new one never appeared. The HelmReleases themselves were not to blame: they showed a state that nobody was updating any more.
No code was changed here either; a manual action helped — deleting the Node object of the removed board: the garbage collector cleaned up all fifteen stuck pods, the controller got a new pod, and thirty-three HelmReleases became Ready on their own. The general lesson: a pod stuck in Terminating on a dead node stops being a trifle as soon as its controller cannot create a replacement. And Recreate with one replica is exactly that case.
What has been tested and what has not
Nothing has been tested on real hardware: I do not have the boards.
In an emulator, with the same image that would go on the card, the following was tested: the arm64 cloud medium boots, the kernel with the Pi configuration starts, the DRBD modules load, the network comes up over DHCP, the installer reaches its console with a working node API, and the image reports its version correctly. An earlier run went further: the medium booted, the installer wrote the disk, the installed system booted from it and brought up kube-apiserver in 42 seconds. I exercised CPU and memory hot-add in the patched hypervisor on an emulated ARM host with GICv2 and nested KVM virtualization — apart from hardware, that is the only place where the GICv2 code actually runs.

On amd64 with real KVM, storage was tested end to end: a volume was created and provisioned across three nodes in under twenty seconds, and the thin pools stayed active while all storage components were restarted one by one.

If you have a Pi 5 and want to check these, make sure the kernel booted in EL2 and /dev/kvm exists. Check that cloud-hypervisor --host-capabilities reports arm-gicv2-acpi-cpu-hotadd-v1. Create a VirtualMachine with small limits and see whether the guest starts booting: if something is wrong with GICv2, the guest will fail as early as interrupt controller initialization. Then raise cpus — that tests hot-add. The machine’s vm.info must show config.cpus.acpi_hotplug: true, otherwise hot-add will not even start.
Join the community
- Cozystack on GitHub
- Telegram group
- Slack group (Get invite at https://slack.kubernetes.io)
- Community Meeting Calendar