Installing a Kubernetes Cluster Managed by Cozystack: A Detailed Guide by Gohost and Ænix
Installing a Kubernetes Cluster Managed by Cozystack: A Detailed Guide by Gohost and Ænix
This article was written by Vladislav Karabasov from Kazakhstani hosting company gohost, therefore the narrative will be conducted in the first person.
At the time of my transition to gohost.kz, the company had already been operating in the Kazakhstan market for 15 years, providing clients with a standard set of services: VPS/VDC, IaaS, virtual hosting, etc. However, clients developed new needs, so I was tasked with developing the direction of Kubernetes as a Service.
That’s how my “2.0 acquaintance” with *nix systems began (this time with Talos Linux), as well as with the world of containers (through Kubernetes). While working on the tasks of launching and developing this new direction, I came across the Open Source platform Cozystack and got acquainted with its developers, Andrey Kvapil and Georg Gaal. We talked, and I decided to deploy a Kubernetes cluster managed by Cozystack, which is based on Talos Linux.
Here’s what interested me in Cozystack:
- The platform allows deploying Kubernetes clusters within an existing cluster without using virtualization for running the Kubernetes control plane, while running the workers as VMs in the existing Kubernetes cluster. This allows optimal resource utilization without compromising security.
- Talos Linux, on which the platform is based, has a very high-security level.
- Moreover, the platform creators are active members of the Kubernetes community and make significant contributions to Open Source, including organizing a community for developing their own etcd-operator.
As it turned out, gohost has been participating in this Open Source project from day one, and right now we are actively testing the platform and preparing to deploy it in industrial operation, meaning providing our hosting clients with services based on Cozystack.
I was motivated to write this article for several reasons: I wanted to systematize the knowledge I had acquired, share my experience of installing Cozystack on Talos Linux with the community, and talk about my experiences working with various tools in the Kubernetes ecosystem. Moreover, there are undoubtedly readers who will find this material useful for their work — in general, this is my humble attempt to give something back to the community. So, let’s begin.
Cluster Topology
Although Cozystack can be deployed on bare metal in just a few minutes, the platform can also be launched in any virtual environment. For instance, I started by deploying clusters in Proxmox and KVM.
However, in this article, I will discuss my experience of installing it on real hardware. Let’s start with the setup — here is the equipment I had:
- VPS 2G/2CPU (although a regular home PC could be used) — 1 unit.
- Switches — 2 units (in aggregation mode — this mode allows increased fault tolerance, bandwidth, and load balancing, Fig. 1) or 1 unit (without aggregation, Fig. 2).
- Servers with local storage on NVMe disks (for containers) and SSD disks (for the operating system). The minimum number of servers in the cluster to ensure fault tolerance is 3 units.
You can also use network-attached storage (NAS), for example, with a DRBD + Linstor combination (we use such NAS in our production environment for VPS, but configuring them is a topic for a separate large article, so in this case, we will limit ourselves to servers).
Here is a diagram of the equipment setup for deploying Cozystack in my case (Fig. 1). I will leave the switching configuration out of the scope here.


When organizing the cluster topology, it is necessary to ensure access to the Internet (SRV1, SRV2, SRV3). In my case, access is managed through a management-host. SRV1, SRV2, and SRV3 use the management-host as their default gateway. Additionally, routing is enabled on the management-host with appropriate iptables rules set up. However, you can use another gateway if preferred — the management-host is needed only for the initial cluster setup.
Management Host Preparation
First, let’s configure the management-host, which will be used to deploy the Kubernetes cluster managed by Cozystack. Assuming you already know how to set up a host with an operating system, I will skip the details — in my case, I used Ubuntu 22.04.
Let’s proceed with the deployment of the management-host. For this, I propose using my bash script, which eliminates the routine of searching for and installing packages, and automates the host configuration. At the time of writing this article, the following package versions were used: talosctl v1.7.1 and kubectl v1.30.1.
#!/bin/bash
RED='\033[0;31m'
GREEN='\033[0;32m'
YELLOW='\033[1;33m'
NC='\033[0m' # No Color
apt update
apt upgrade -y
apt -y install ntp bind9 curl jq nload
service ntp restart
#service ntp status
sed -i -r 's/listen-on-v6/listen-on/g' /etc/bind/named.conf.options
sed -i '/listen-on/a \\tallow-query { any; };' /etc/bind/named.conf.options
apt -y install apt-transport-https ca-certificates curl software-properties-common
curl -fsSL https://download.docker.com/linux/ubuntu/gpg | sudo gpg --dearmor -o /usr/share/keyrings/docker-archive-keyring.gpg
echo "deb [arch=$(dpkg --print-architecture) signed-by=/usr/share/keyrings/docker-archive-keyring.gpg] https://download.docker.com/linux/ubuntu $(lsb_release -cs) stable" | sudo tee /etc/apt/sources.list.d/docker.list > /dev/null
apt update
apt install -y docker-ce snapd make dialog nmap
#systemctl status docker
#curl -sL https://talos.dev/install | sh
releases=$(curl -s https://api.github.com/repos/siderolabs/talos/releases | jq -r '.[].tag_name' | head -n 10)
echo -e "${YELLOW}Select version to download:${NC}"
select version in $releases; do
if [[ -n "$version" ]]; then
echo "You have selected a version $version"
break
else
echo -e "${RED}Incorrect selection. Please try again. ${NC}"
fi
done
url="https://github.com/siderolabs/talos/releases/download/$version/talosctl-linux-amd64"
wget $url -O talosctl
chmod +x talosctl
sudo mv talosctl /usr/local/bin/
#kubectl
releases=$(curl -s https://api.github.com/repos/kubernetes/kubernetes/releases | jq -r '.[].tag_name' | grep -E '^v[0-9]+\.[0-9]+\.[0-9]+$' | head -n 10)
echo -e "${YELLOW}Select kubectl version to download:${NC}"
select version in $releases; do
if [[ -n "$version" ]]; then
echo "You have selected a version $version"
break
else
echo -e "${RED}Incorrect selection. Please try again. ${NC}"
fi
done
url="https://storage.googleapis.com/kubernetes-release/release/$version/bin/linux/amd64/kubectl"
wget $url -O kubectl
chmod +x kubectl
sudo mv kubectl /usr/local/bin/
curl -fsSL -o get_helm.sh https://raw.githubusercontent.com/helm/helm/main/scripts/get-helm-3
chmod 700 get_helm.sh
./get_helm.sh
curl -LO https://github.com/kvaps/kubectl-node-shell/raw/master/kubectl-node_shell
chmod +x ./kubectl-node_shell
sudo mv ./kubectl-node_shell /usr/local/bin/kubectl-node_shell
curl -LO https://github.com/aenix-io/talm/releases/download/v0.5.7/talm-linux-amd64
chmod +x ./talm-linux-amd64
sudo mv ./talm-linux-amd64 /usr/local/bin/talm
echo "Specify the directory name for the configuration files,"
echo -e "the directory will be located in the catalog ${GREEN}/opt/${NC}. By default: ${GREEN}/opt/cozystack${NC}"
echo -e "${YELLOW}"
read -p "Enter the directory name: " cozystack
echo -e "${NC}"
if [ -z "$cozystack" ]; then
cozystack="cozystack"
fi
mkdir -p /opt/$cozystack
curl -LO https://github.com/aenix-io/talos-bootstrap/raw/master/talos-bootstrap
mv talos-bootstrap /opt/$cozystack
chmod +x /opt/$cozystack/talos-bootstrap
snap install yq
echo -e "${YELLOW}Specify IP network for etcd and kubelet${NC}"
echo -e "Default: ${GREEN} 192.168.100.0/24 ${NC}"
read -p "IP network (network/mask): " IPEK
if [ -z "$IPEK" ]; then
IPEK="192.168.100.0/24"
fi
#ADD FORWARD (RELATED,ESTABLISHED)
rule1="-d $IPEK -m state --state RELATED,ESTABLISHED -m comment --comment $cozystack -j ACCEPT"
if ! iptables-save | grep -q -- "-A FORWARD $rule1"; then
iptables -I FORWARD -d $IPEK -m state --state RELATED,ESTABLISHED -m comment --comment $cozystack -j ACCEPT
fi
# ADD FORWARD
rule2="-s $IPEK -m comment --comment $cozystack -j ACCEPT"
if ! iptables-save | grep -q -- "-A FORWARD $rule2"; then
iptables -I FORWARD -s $IPEK -m comment --comment $cozystack -j ACCEPT
fi
# ADD NAT
rule3="-s $IPEK -m comment --comment $cozystack -j MASQUERADE"
if ! iptables-save | grep -q -- "-A POSTROUTING $rule3"; then
iptables -t nat -I POSTROUTING -s $IPEK -m comment --comment $cozystack -j MASQUERADE
fi
#sysctl -w net.ipv4.ip_forward=1
if ! grep -qF "$REQUIRED_SETTING" "$FILE"; then
echo "net.ipv4.ip_forward = 1" | sudo tee -a "/etc/sysctl.conf" > /dev/null
fi
sysctl -p
apt -y install iptables-persistent
cat > /opt/$cozystack/patch.yaml /opt/$cozystack/patch-controlplane.yaml Fig. 3. Directory /opt/cozystack
The management host is ready for further work.
### Booting from the Talos Linux System Image
The operating system that Cozystack is based on is Talos Linux. There are several ways to install Cozystack:
- **PXE** — for installation using temporary DHCP and PXE servers running in Docker containers.
- **ISO** — for installation using ISO images.
- **Hetzner** — for installation on Hetzner servers.
We will use the [ISO file](https://github.com/aenix-io/cozystack/releases) for installation. The Cozystack developers generate and test ready-to-use platform images with all necessary software. All software also undergoes compatibility testing with the platform and the Talos Linux distribution.
### Initial System Configuration
After booting from the image, the screen looks like this. Now, we need to configure the network settings — to do this, press F3 (if using PXE installation, addressing on the nodes is configured automatically).

Fig. 4. Talos Linux screen after loading
We set the network addresses — you can specify multiple DNS and Time Servers (entered separated by spaces or commas). Click “Save.”

Fig. 5. Talos Linux setup screen
Similarly, configure the remaining nodes. I used my own addressing, so some of the IP addresses in the screenshots will be blurred.
### Starting the Installation with talos-bootstrap
Run the file `./talos-bootstrap` without any parameters to get the help information.

Fig. 6. talos-bootstrap (first start)
After that, run `./talos-bootstrap install`, and in the first dialog window, it will suggest the default cluster name — it matches the directory where the script is located (by default, the name will be `cozystack` if you haven’t specified your own name).

Fig. 7. talos-bootstrap (cluster naming)
Set the network in which the nodes will be searched.

Fig. 8. talos-bootstrap (searching for nodes in the specified network)
The script will automatically find the nodes and display them — as we can see, all three of our nodes were found. At one point, node discovery stopped working on the management host running AlmaLinux, but I didn’t troubleshoot this issue and simply switched to Ubuntu.
You can also search for nodes manually using the command: `nmap -Pn -n -p 50000 your_ip_network -vv | awk ‘/Discovered open port/ {print $NF}’`.(This outputs a list of IPs.)

Fig. 9. talos-bootstrap (selecting a node for installation)
At this stage, select the “ControlPlane” option and click OK (all 3 nodes in the cluster are set up as Control Plane).

Fig. 10. talos-bootstrap (select the role of the node)
Next, the script takes all the settings from the nodes (we configured them when we set the network settings in Talos Linux, Fig. 5) and outputs them to the console. We only need to confirm that everything is correct.

Fig. 11. talos-bootstrap (specify the host name)
Selecting the disk to install the system on — for me, it’s `sda`.

Fig. 12. talos-bootstrap (selecting the disk to installing)
After that, our interface with the pre-configured IP address appears (in my case, it’s `eno4`). Agree and click “OK”.

Fig. 13. talos-bootstrap (selecting network interface)
Select our gateway, then agree.
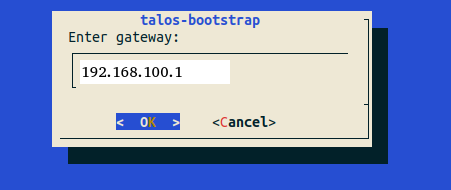
Fig. 14. talos-bootstrap (the gateway will be used for Internet access)
The window for entering DNS server addresses appears; you can add them separated by spaces. After that, click “OK”.
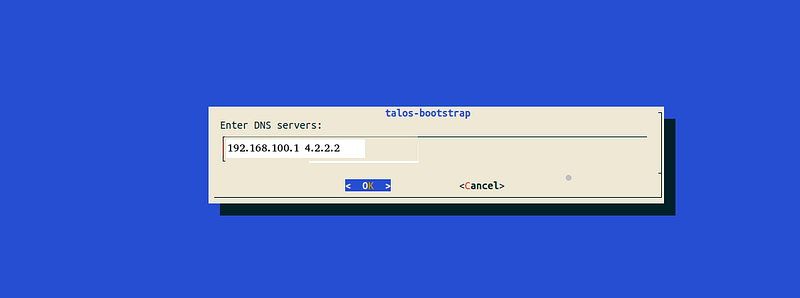
Fig. 15. talos-bootstrap (specify the DNS servers or agree with the suggested ones)
In the next window, you need to enter the floating IP. This mechanism in Talos is very similar to how VRRP works, but instead of using a low-level network protocol for state checking, it uses an etcd cluster deployed on the Control Plane nodes. The floating IP is used to ensure high availability of the cluster in the network: it “floats” between nodes, allowing the IP address to move without changing the configuration. Enter any free IP from our network’s address space here (you can use the same one as in the topology diagram, for example, `192.168.100.10`) — this will be the cluster’s IP.

Fig. 16. talos-bootstrap (enter the floating IP)
After that, a window with our IP should appear. Agree again.

Fig. 17. talos-bootstrap (API for kubelet)
Next, the script will display the settings that are applied to the master node.

Fig. 18. talos-bootstrap (the final configuration for starting the installation)
Click “OK” and wait for the installation to complete. During the installation process, similar lines will appear on our node:

Fig. 19. talos-bootstrap (Talos Linux screen)
On the management host in another console, you can observe an increase in traffic consumption (using the nload utility) — this means that the image is being downloaded from the network.

Fig. 20. nload (network load monitor)
After the installation, the node will be rebooted, and the progress bar will first show 20%, then 50%, then 70%. It is at 70% that the node will reboot. Wait again — the speed of the internet connection will determine the wait time: the faster the internet, the quicker the download.

Fig. 21. talos-bootstrap (installation process)
After installing the first node of the cluster, we are prompted to install etcd. Click “Yes”.
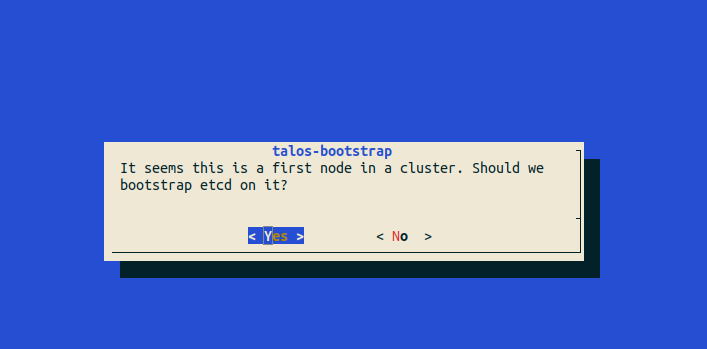
Fig. 22. talos-bootstrap (etcd installation)
The remaining nodes are installed in a similar manner, except for the second-to-last step. So, let’s proceed with installing the remaining nodes.

Fig. 23. talos-bootstrap (installation process is done)
Now we have the first node of our future cluster.
After the installation, new files will appear in the `/opt/your_name` directory — the `ls` command should produce the following output:
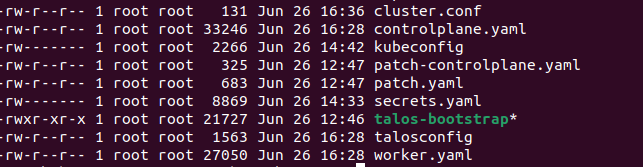
Fig. 24. New files in the directory
In this directory, you need to execute a series of commands — they will create directories with configuration files in the user’s directory. These files are necessary for kubectl and talosctl to function.
``` graf
mkdir $HOME/.kube/
mkdir $HOME/.talos/
cp -i kubeconfig $HOME/.kube/config
cp -i talosconfig $HOME/.talos/config
If you don’t do this, you’ll have to load the configuration files manually: for talosctl, use the command talosctl --talosconfig=config_file, and for kubectl, you’ll need to either run KUBECONFIG=config_file in the user’s console (which will only be valid for the current session) or consistently specify the configuration file with kubectl --kubeconfig=config_file.
Next, execute the command:
kubectl get node
And you will get the following output:

After installing the remaining nodes, we have completed the initial setup of the cluster. At this point, it contains only a few system components, and the nodes are in a NotReady state because we disabled the installation of CNI and kube-proxy in the Talos configuration. These components will be provided and managed by Cozystack.
Installing Cozystack
Create a directory named manifests and place a file named cozystack-config.yaml inside it:
apiVersion: v1
kind: ConfigMap
metadata:
 name: cozystack
 namespace: cozy-system
data:
 bundle-name: "paas-full"
 ipv4-pod-cidr: "10.244.0.0/16"
 ipv4-pod-gateway: "10.244.0.1"
 ipv4-svc-cidr: "10.96.0.0/16"
 ipv4-join-cidr: "100.64.0.0/16"
Execute the following commands sequentially:
kubectl create ns cozy-systemcreates a new namespace in Kubernetes namedcozy-system. Namespaces are used to organize resources within a Kubernetes cluster.kubectl apply -f cozystack-config.yamlapplies the configuration from the specified file, detailing the configuration data namedcozystackwithin thecozy-systemnamespace. This file outlines the networks that will be used in the cluster.kubectl apply -fhttps://github.com/aenix-io/cozystack/raw/v0.7.0/manifests/cozystack-installer.yaml
kubectl create ns cozy-system
kubectl apply -f cozystack-config.yaml
kubectl apply -f https://github.com/aenix-io/cozystack/raw/v0.7.0/manifests/cozystack-installer.yaml
Run the following:
whatch -n1 kubectl get hr -A
And now, wait until the state READY becomes True in all NAMESPACEs.

When this happens, we can proceed.
Disk subsystem configuration
Execute the following commands:
alias linstor=’kubectl exec -n cozy-linstor deploy/linstor-controller — linstor’
linstor node list
We should get the following output:
+-------------------------------------------------------+

| Node | NodeType  | Addresses                 | State  |

|=======================================================|

| srv1 | SATELLITE | 192.168.100.11:3367 (SSL) | Online |

| srv2 | SATELLITE | 192.168.100.12:3367 (SSL) | Online |

| srv3 | SATELLITE | 192.168.100.13:3367 (SSL) | Online |

+-------------------------------------------------------+
linstor physical-storage list
+--------------------------------------------+

| Size         | Rotational | Nodes          |

|============================================|

| 107374182400 | True       | srv3[/dev/nvme1n1,/dev/nvme0n1 ] |

|              |            | srv1[/dev/nvme1n1,/dev/nvme0n1] |

|              |            | srv2[/dev/nvme1n1,/dev/nvme0n1] |

+--------------------------------------------+
Create a storage pool. In my case, these are the disks /dev/nvme1n1 and /dev/nvme0n1, but you may have different ones:
linstor ps cdp zfs srv1 /dev/nvme1n1 /dev/nvme0n1 — pool-name data — storage-pool data
linstor ps cdp zfs srv2 /dev/nvme1n1 /dev/nvme0n1 - pool-name data - storage-pool data
linstor ps cdp zfs srv3 /dev/nvme1n1 /dev/nvme0n1 - pool-name data - storage-pool data
Enter the command:
linstor sp l
Let’s see what we have:

Now let’s create storage classes for persistent storage: while our underlying storage is already configured, we need to inform Kubernetes that it can create volumes in this storage. This is done using the StorageClass resource. So, we will create two classes:
local— for local storage.replicated— for data that requires replication.
kubectl create -f- Fig. 28. List of storage classes
### Network Configuration
Set a pool for allocating IP addresses from the subnet that we specified earlier (see Fig. 1). Note: If you have a different address space (e.g., `192.168.100.200/192.168.100.250`), it will be necessary to make changes to the configuration because the settings here are applied immediately without creating a file. However, you can save the configuration to a file and apply the manifest using `kubectl apply -f path_to_file`.
``` graf
kubectl create -f- Fig. 29. Authorization window
Click on “tenant-root”:
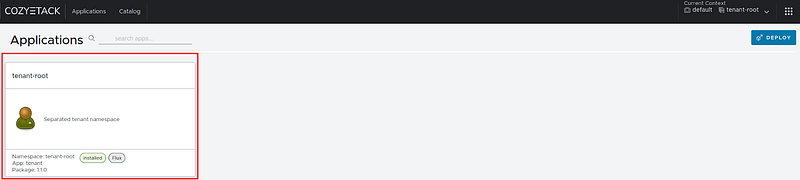
Fig. 30. Choose tenant-root
Click on “Upgrade” to redeploy the application with the parameters we need:
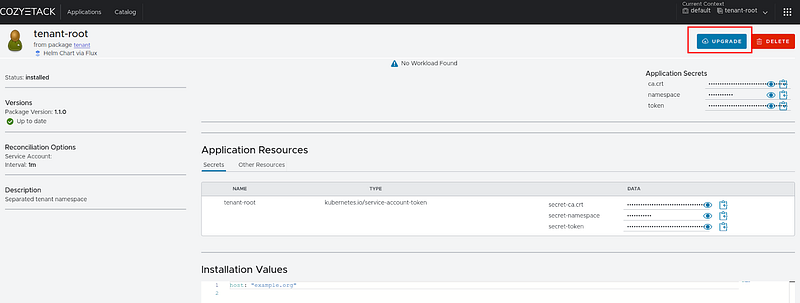
Fig. 31. Proceed to update tenant-root
If the page doesn’t refresh immediately, press F5.

Fig. 32. Window for making changes to tenant-root
Enter your values; we will type `kuber.gohost.kz` in the host field, move the sliders from `false` to `true`, and click “DEPLOY”.
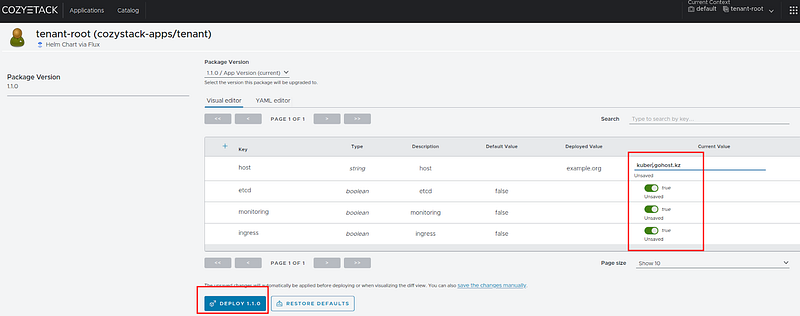
Fig. 33. Add components and update tenant-root
You will be redirected to a page where you can see the configured values:

Fig. 34. tenant-root is updated
Now, enter the following command in the console to view the list of all PersistentVolumeClaims (PVCs) in the specified namespace `tenant-root` in the cluster:
``` graf
kubectl get pvc -n tenant-root
If your output is similar to mine, then everything is fine:

Returning to the web interface on the main page, you should see something like this:
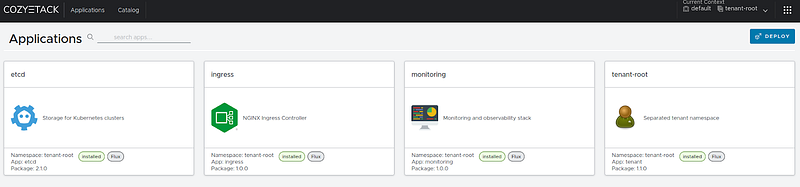
Checking the pods
To check the pods, execute the standard command:
kubectl get pod -n tenant-root
The output should look something like this:

tenant-root namespace
Now execute the following command:
kubectl get svc -n tenant-root root-ingress-controller
In the output, we should see the public IP address of the ingress controller:
NAME                      TYPE           CLUSTER-IP     EXTERNAL-IP       PORT(S)                   AGE
root-ingress-controller   LoadBalancer   10.96.58.227   192.168.100.200   80:30149/TCP,443:32152/TCP   7d8h
Monitoring
After installing the Cozystack platform, we have pre-configured monitoring based on Grafana. We set up monitoring during the tenant-root upgrade (Figures 27–31). Let’s verify the monitoring settings.
To begin, select the “monitoring” tile on the main page:
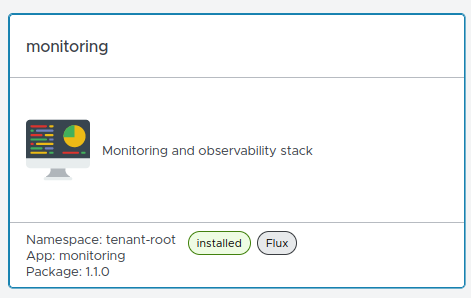
Click the “Upgrade” button. In the host field, verify your values (for example, grafana.kuber.gohost.kz). You can obtain the credentials by viewing or copying the password and user.

To access the web interface, you will need to update the /etc/hosts file on the management host with the following data.
192.168.100.200 gafana.kuber.gohost.kz
On this host, open a web browser and enter grafana.kuber.gohost.kz. This will open the Grafana interface.

As a result of the steps we’ve taken, we have achieved the following:
- A three-node cluster based on Talos Linux.
- Storage that includes LINSTOR with ZFS and DRBD under the hood.
- A user-friendly interface.
- Pre-configured monitoring.
In the next article of this series, we will explore Kubernetes in Kubernetes, understand how Kubernetes as a Service functions in Cozystack, and examine the application catalog, where applications can be deployed with just a few clicks. We will assign real IP addresses to the cluster and set it up for public network access.
And that’s it — we’ve successfully installed the Cozystack cluster! Stay tuned for more… 😊
Additional links
- Cozystack on Talos Linux, Andrei Kvapil, Talos Linux Install Fest’24
- DIY: Create Your Own Cloud with Kubernetes (Part 1)
- DIY: Create Your Own Cloud with Kubernetes (Part 2)
- DIY: Create Your Own Cloud with Kubernetes (Part 3)
- Cozystack community
- Cozystack community meetings (calendar)
- Cizystack documentation